Arduino Relay Circuit - Arduino Control Relay / A relay coil requires 20ma to open.. The circuit shown in the diagram below uses a relay to switch 12v across a dc motor. Here's a simple animation illustrating how the relay uses one circuit to switch on another circuit. Types of relay modules here at as you can see, controlling the relay with the arduino is as simple as controlling an output where you just need to send. A relay is an electrically operated switch that you can this article shows how to control mains voltage with the arduino using a relay module. This arduino relay tutorial will cover:
How to interface relay module with arduino? Types of relay modules here at as you can see, controlling the relay with the arduino is as simple as controlling an output where you just need to send. It is not possible to connect a digital i/o pin directly to the coil of the relay because the coil needs a large current of around 150ma to drive the relay. As previously described we will use a 5v adapter as a separate power supply for the electromagnet connected to the jdvcc and the. An arduino digital i/o pin can drive 40ma max (and around 20ma nominal).
Arduino Relay Module Tutorial Microcontroller Tutorials from i2.wp.com The arduino can be programmed to turn on the relay when a certain event occurs, for example when the temperature of a thermistor gets higher than 30°c. How does the relay works? In a previous tutorial, we have learned how to turn on/off an led. What is a relay module? In the past, i used to build a circuit just like the above. Optocouplers are in use to isolate the arduino output pins from the circuit driving the relay coils. In this arduino relay tutorial, i will show you how to use a relay with microcontrollers. October 1, 2017arduino tutorialsarduino, relaymanoj r.
In this arduino project, i have shown how to use lora with arduino for different iot projects.
For that we use digitalwrite(0, high); The arduino can be programmed to turn on the relay when a certain event occurs, for example when the temperature of a thermistor gets higher than 30°c. A relay accomplishes this by using the 5v outputted from an arduino pin to energize the electromagnet which in turn closes an internal * thats it our circuit is complete, now we can upload the code to the arduino to turn on or off the relay. The circuit shown in the diagram below uses a relay to switch 12v across a dc motor. It is not possible to connect a digital i/o pin directly to the coil of the relay because the coil needs a large current of around 150ma to drive the relay. Relay module from bottom side is open when ac is connected do not touch the circuit. We will control two different devices using it. An arduino digital i/o pin can drive 40ma max (and around 20ma nominal). The following circuit shows how to control a relay with your arduino or esp8266 microcontroller. First we will control a simple led then we will control a light bulb using it. This arduino relay tutorial will cover: Arduino program for relay module. Here we will use the reyax rylr890 lora module to design a lora arduino circuit that can control a relay module from 10 km distance.
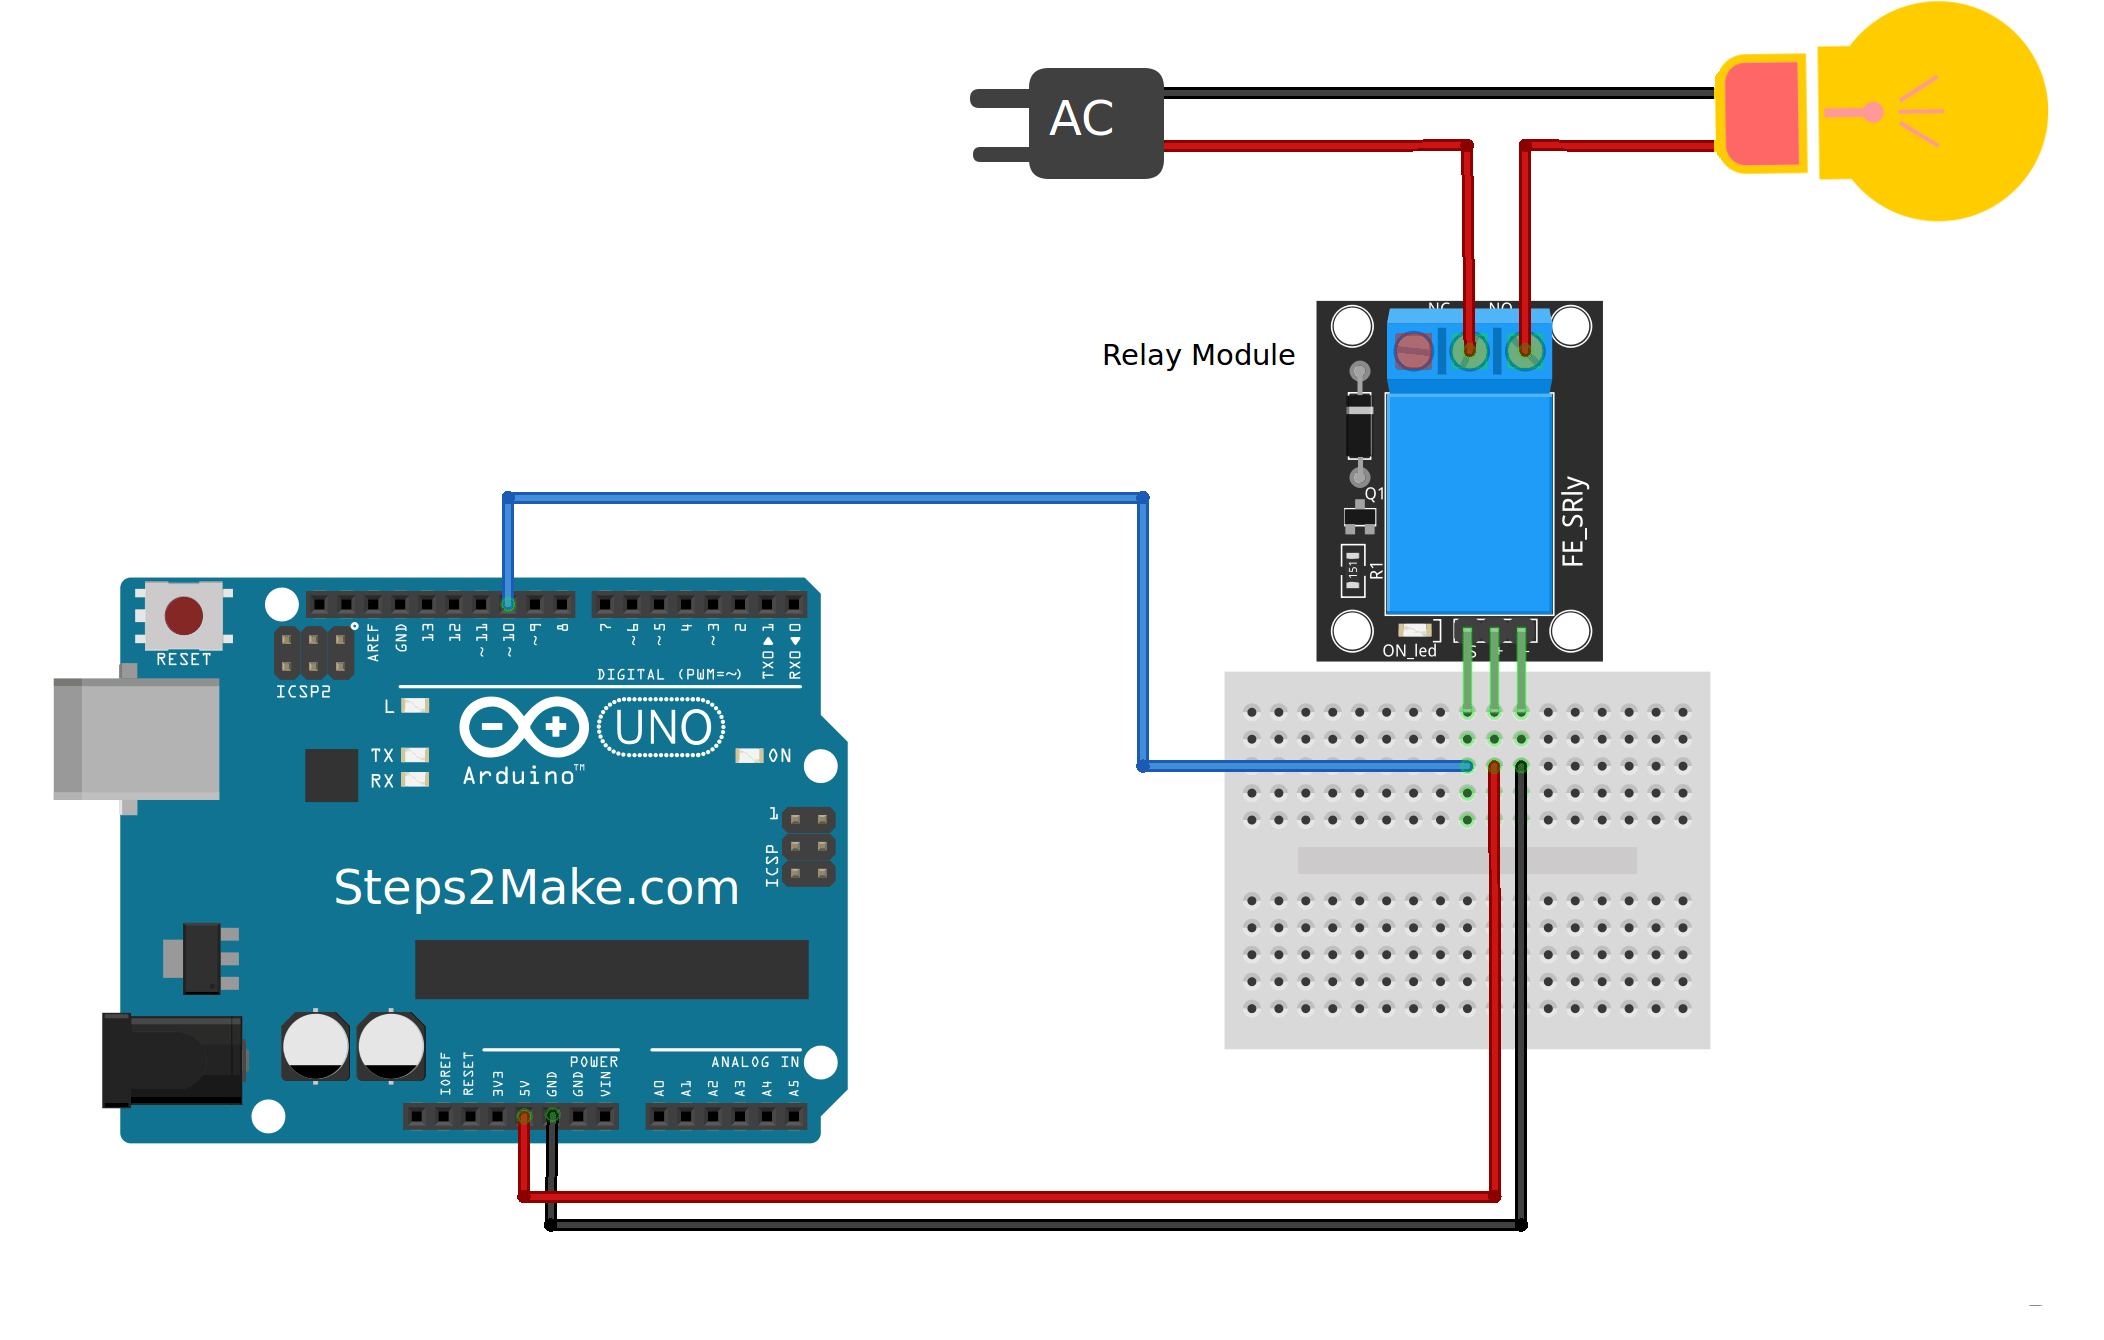
That's where the relay module comes in. We will control two different devices using it. The arduino can be programmed to turn on the relay when a certain event occurs, for example when the temperature of a thermistor gets higher than 30°c. For that we use digitalwrite(0, high); Relay module from bottom side is open when ac is connected do not touch the circuit.
Arduino 5v Relay Module Ky 019 Steps2make from steps2make.com To turn on the motor, the program writes a high value to pin 3, which activates. The circuit shown in the diagram below uses a relay to switch 12v across a dc motor. What is a relay module? A relay accomplishes this by using the 5v outputted from an arduino pin to energize the electromagnet which in turn closes an internal * thats it our circuit is complete, now we can upload the code to the arduino to turn on or off the relay. How does the relay works? The circuit is used a relay wthe arduino to control high voltage electronics.parts.relay (5 vdc)2.2 k resistor330 ohm resistorgreen led in4007 rectifier diodebc547 transistor. Here's a simple animation illustrating how the relay uses one circuit to switch on another circuit. Here we are not using any relay driver ic like uln2003 and will only use an npn transistor to control relay.
An arduino digital i/o pin can drive 40ma max (and around 20ma nominal).
How to use relay to control high power load? It is not possible to connect a digital i/o pin directly to the coil of the relay because the coil needs a large current of around 150ma to drive the relay. It is used to programmatically control on/off the. Do not connect in any ways the main power supply that drive the load to the arduino and transistor circuitry! How does the relay works? What is a relay module? Here we will use the reyax rylr890 lora module to design a lora arduino circuit that can control a relay module from 10 km distance. A relay accomplishes this by using the 5v outputted from an arduino pin to energize the electromagnet which in turn closes an internal * thats it our circuit is complete, now we can upload the code to the arduino to turn on or off the relay. Optocouplers are in use to isolate the arduino output pins from the circuit driving the relay coils. The arduino can be programmed to turn on the relay when a certain event occurs, for example when the temperature of a thermistor gets higher than 30°c. For that we use digitalwrite(0, high); You can use a relay module to control the ac mains and arduino to control the relay. Here's a simple animation illustrating how the relay uses one circuit to switch on another circuit.
A relay coil requires 20ma to open. This post shows how to use a relay module with an arduino board. We will control two different devices using it. How does the circuit works. Here we are not using any relay driver ic like uln2003 and will only use an npn transistor to control relay.
Program Relay 1 Channel Pada Arduino from 1.bp.blogspot.com To turn on the motor, the program writes a high value to pin 3, which activates. Here's a simple animation illustrating how the relay uses one circuit to switch on another circuit. An arduino digital i/o pin can drive 40ma max (and around 20ma nominal). It is not possible to connect a digital i/o pin directly to the coil of the relay because the coil needs a large current of around 150ma to drive the relay. The arduino can be programmed to turn on the relay when a certain event occurs, for example when the temperature of a thermistor gets higher than 30°c. This arduino relay tutorial will cover: The circuit is used a relay wthe arduino to control high voltage electronics.parts.relay (5 vdc)2.2 k resistor330 ohm resistorgreen led in4007 rectifier diodebc547 transistor. How to interface relay module with arduino?
This arduino relay tutorial will cover:
October 1, 2017arduino tutorialsarduino, relaymanoj r. You can use a relay module to control the ac mains and arduino to control the relay. Arduino program for relay module. Do not connect in any ways the main power supply that drive the load to the arduino and transistor circuitry! A relay accomplishes this by using the 5v outputted from an arduino pin to energize the electromagnet which in turn closes an internal * thats it our circuit is complete, now we can upload the code to the arduino to turn on or off the relay. In the past, i used to build a circuit just like the above. A relay coil requires 20ma to open. An arduino digital i/o pin can drive 40ma max (and around 20ma nominal). That's where the relay module comes in. To turn on the motor, the program writes a high value to pin 3, which activates. Here's a simple animation illustrating how the relay uses one circuit to switch on another circuit. /*5v relay connection with arduino arduino pin relay circuit. Relay module from bottom side is open when ac is connected do not touch the circuit.